
Organizing pots and pans in the kitchen can help save space and make it easier to find what you need. How you store and organize them can contribute to the general appearance of your kitchen. This post explores practical tips and hacks on how to organize pots and pans in the kitchen effectively and protect them from damage:
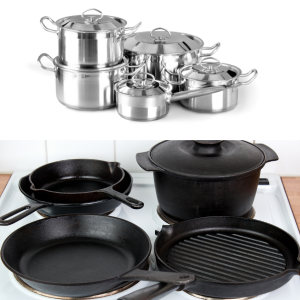
How to Organize Pots and Pans Made of Stainless Steel.
1. Use a Pot Rack: If you have limited cabinet space, consider installing a pot rack in your kitchen. This can free up cabinet space and also serve as a decorative element in your kitchen.
2. Stacking and Nesting: For pots and pans that can be stacked or nested, utilize this feature to save space. Stack smaller pans inside larger ones or nest pots together to reduce clutter.
3. Vertical Storage: Consider storing your stainless steel pots and pans vertically using a pot lid rack or a pegboard. The vertical storage method can make it easy for you to grab the pot or pan you need without having to shuffle through a stack of cookware.
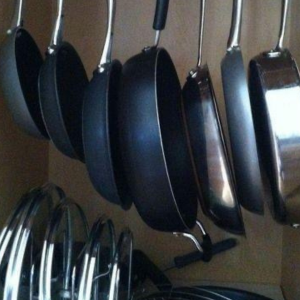
4. Hang Them: Install hooks or a hanging system on a wall. Use S-hooks, a rail, a rack, a pegboard, or the underside of a cabinet to hang your pots and pans. Hanging them can be a convenient way to store your cookware and also add a decorative touch to your kitchen.
5. Use Cabinets or Shelving
Dedicate Storage Spaces in cabinets or shelving designed for pots and pans to keep them organized and secure.
6. Label or Color Code your pots: If you have multiple sets of pots and pans, consider labeling them or using a color-coding system to identify which set to use for specific purposes easily.
How to protect stainless steel pots and pans from damage
Protecting your stainless pots from dents and damage while organizing them is essential to maintain their longevity and appearance. Here are some practical strategies you can use to protect them:
1. Use Soft Liners
Felt or Fabric Liners: Place soft liners, like felt or cotton fabric, between pots. Liners prevent direct contact between cookware and minimize the risk of scratches or dents.
2. Stack Efficiently
Stack pots from largest to smallest. Stacking not only makes them stable but also prevents smaller pots from getting crushed.
Don’t stack too many pots on top of each other. Doing so can lead to instability and increase the risk of them toppling over.
3. Utilize Protection While Stacking
Paper Towels or Bubble Wrap: Use paper towels, cloths, or bubble wrap to separate stacked pots. The wrap helps to provide cushioning and absorb shock.
4. Hang
Use a pot rack: Consider using a pot rack to hang stainless steel pots. Hanging pots keeps them off surfaces and prevents nesting, which can cause chipping or damage to the cookware.
5. Use Drawer dividers
In drawers, use dividers to keep pots separated and prevent them from banging into each other.
6. Store Lid Separately
Avoid Bumping: Store lids separately or use a lid organizer to prevent them from banging against pots and pans.
7. Regular Checks
Inspect Regularly: Periodically check your stainless steel pots for any signs of damage or wear. Please address any issues before they worsen.
8. Mindful Handling
Careful Lifting: Always lift your stainless steel pots rather than dragging them across surfaces to avoid scratches or dents.
How to organize pots and pans made from cast-iron
Organizing cast-iron pots and pans can help keep your kitchen tidy and make cooking more enjoyable. Here are some creative and practical ideas to manage them effectively:
1. Use a Pot Rack
Wall-Mounted Rack: Install a wall-mounted pot rack to hang your cast iron skillets and pots. A rack makes them easily accessible and adds a rustic touch to your kitchen.
Ceiling Rack: If you have the space in your kitchen, a ceiling pot rack is an excellent option for showcasing your cast-iron collection.
2. Utilize Cabinet Space
Stacking: Stack smaller skillets and pans inside larger ones. Use a pan protector (a cloth or silicone insert) between them to prevent scratches.
Organization Bins: Use bins or baskets to group similar pots or lids. Bins keep your pots organized and make it easy to pull them out whenever you need to.
3. Drawer Organizers
Deep Drawers: If you have deep drawers, use them to store cast-iron skillets or pots flat. Add dividers to keep them organized and prevent scratches.
Slide-Out Shelves: Consider installing slide-out shelves for easy access to heavier cast-iron cookware, eliminating the need to strain your back.
4. Use a Dedicated Shelf
Open Shelves: Allocate a dedicated shelf for your cast iron items. Display them neatly and use shelf dividers for better organization.
5. Magnetic Strip
Magnetic Strip: A strong magnetic strip can hold smaller cast-iron skillets or lids. Install it on the wall or the side of a cabinet.
6. Pot Lid Organizer
Vertical Storage: Use a pot lid organizer to store cast iron lids upright. This method saves space and makes it easier to find the correct lid for each pot.
7. Lazy Susan
Corner Cabinets: Place your cast iron pots on a lazy Susan in a corner cabinet. Lazy Susans make it easy to reach items.
8. Hooks or Pegboards
Pegboard Wall: Install a pegboard on a wall for versatile storage. Hang pans, lids, and utensils without taking up counter or cabinet space.
Hooks: Use hooks to hang your pans independently if space allows, keeping them visible and accessible.
9. Under-Sink Storage
If you have a larger cast-iron pot or a Dutch oven, check the area under the sink. Ensure it’s clean and dry before storing your pots there.
10. Portable storage Carts
Kitchen Cart: Consider using a kitchen cart to store and display your cast iron collection while keeping it mobile.
Regardless of how you choose to organize your cast-iron pots and pans, remember that they require some maintenance. Ensure they are dry to prevent rust, and consider seasoning them regularly to maintain their quality and performance.
How to maintain and prevent rust on your cast-iron pots and pans
Preventing rust on cast iron cookware is essential to maintain its functionality and longevity. Here are some practical tips to keep your cast iron in great shape:
1. Season Regularly
Oil Layer: After each use and cleaning, apply a thin layer of cooking oil to the inner surface of your cast-iron cookware while it’s still warm to help create a protective layer and enhance seasoning.
2. Keep It Dry
Wipe dry. After cleaning, dry your cast iron immediately with a lint-free cloth or paper towel to prevent moisture buildup.
Heat to Dry: For extra dryness, place it on the stovetop over low heat for a few minutes to ensure all moisture has evaporated
3. Avoid Soaking
Minimal Water: Never soak your cast iron in water or leave it in the sink. Water can cause rusting, as prolonged exposure to moisture is detrimental to metal.
4. Use Appropriately
Avoid Acidic Foods: Cooking highly acidic foods (like tomatoes or vinegar) in unseasoned cast iron can strip away the protective layer. If you do cook acidic foods, ensure they’re well-seasoned.
5. Store Properly
Cool and Dry: Always store your cast iron cookware in a cool, dry place. If stacking them, place paper towels or cloths between them to absorb moisture and prevent scratches.
6. Use Silica Gel Packs
Moisture Absorbers: If you live in a humid area, place cedar inserts or silica gel packs in drawers or cabinets where you store your cast iron cookware to absorb moisture, which will reduce the chances of rusting in metal
7. Check and Re-season
Inspect Regularly: Keep an eye on your cast iron for any signs of rust. If you spot any, lightly scrub it with fine steel wool, wash it, dry it, and re-season it.
8. Maintain Cooking Temperature
Heat Management: When cooking, ensure that you heat your cast iron gradually to avoid thermal stress, which can diminish the seasoning.
9. Use as Often as Possible
Frequent use of your cast-iron cookware helps maintain the seasoning and prevents it from rusting.
How to organize non-stick and ceramic pots and lids
1. Use Pan Organizer Racks
Organizer racks enable you to store your non-stick pots and pans vertically, keeping them separate. Storing them on a shelf can prevent scratching and make it easier to access what you need without having to dig through stacks.
2. Stack Carefully
If you need to stack your non-stick pots and pans, place a soft towel or a felt pan protector between each piece to prevent scratches. This cushioning will help avoid direct contact and minimize the risk of scratches on the non-stick surface.
3. Hang for Accessibility
Consider utilizing vertical space by hanging your pots and pans on wall-mounted hooks or a pot rack. Hanging them not only saves space but ensures that your cookware is easy to reach and on display.
4. Lid Organization
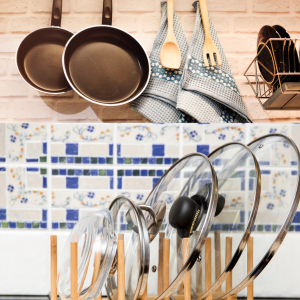
For lids, a sideways storage solution works best. Using an organizer with tiered sections can help keep lids neatly stored and easily accessible.
5. Pegged Drawer Organizers
Inside drawers, a pegged organizer can be a handy addition. It helps to secure pans and pots individually, preventing them from moving around and getting scratched.
How to protect non-stick pots and pans from dents and damage
1. Use Soft Liners
Fabric or Paper Towels: Place a soft fabric, like a dish towel or paper towels, between stacked pots. Soft liners can prevent scratching and protect the non-stick surface.
2. Avoid Stacking
If possible, avoid stacking non-stick pots altogether. If you must stack them, always ensure there’s a protective layer in between.
3. Use a dedicated Drawer or Shelf
Separate Storage Area: Store non-stick pots on a dedicated shelf or in a drawer to minimize contact with other cookware, such as metal pans that could scratch their surface.
4. Use Hanging Hooks or Racks
Pot Racks: Consider using a pot rack to hang non-stick pots and pans. This way, they avoid nesting and any friction that could damage the coating.
5. Proper Cleaning
Gentle Cleaners: Always use gentle sponges or cloths for cleaning. Avoid using abrasive cleaners or scouring pads, as they can wear down the non-stick surface.
6. Avoid High Heat
When storing, ensure pots are completely cool before stacking or placing them away. High heat can cause the material to warp and damage the coating over time.
7. Use Proper Utensils
Silicone or Wooden Utensils: When cooking on your non-stick pots, opt for silicone or wooden utensils to prevent scratching while cooking.
8. Cover When Not in Use
Lid or Cover: If possible, cover your non-stick pots with a lid or a cloth to protect them from dust and accidental scratches.
9. Store Them Upright
Vertical Storage: If space allows, store pots upright in a cabinet rather than stacking them. Use pot organizers if necessary.
10. Inspect Regularly
Check for Damage: Periodically check the non-stick coating for any signs of wear or damage. Address any issues promptly to avoid further deterioration.
Factors to consider before and after organizing your pots and pans in the kitchen
1. Declutter and sort
Start by going through your pots and pans to see which ones you use regularly and which ones you rarely use. Consider donating or discarding the ones you no longer need.
2. Group or sort cookware by type and Size
Group your pots and pans by type and size. For example, stack saucepans together, group frying pans, and store lids together separately.
By Size: Arrange pots and pans from the largest to the smallest.
By Type: Group similar items such as frying pans, saucepans, and stockpots together.
3. Assess Your Space
Ensure there is sufficient space in your kitchen cabinets, drawers, and countertops for storing your pots.
4. Consider Usage Frequency
Identify the pots and pans you use daily versus those you use occasionally. Consider organizing them based on how frequently you use each one and what you cook in it most often.
5. Gather Supplies you will need to organize your pots, such as
Shelf Liners: Liners help to protect cookware surfaces and prevent scratching.
Pot Rack or Hooks: These are great for hanging pots and pans if you’re short of cabinet space.
Dividers or Organizers: Use these to stack or separate cookware in drawers or cabinets.
Labels (optional): For easy identification.
6. Clean Your Pots and Pans before You Organize Them
Clean and remove any grease and Food Residue: Ensure all non-stick cookware is clean and dry. Inspect for any scratches or peeling; replace if necessary.
5. Choose Storage Solutions suitable for your pots and lids
Here are some storage solutions to consider for your cookware.
a) Cabinets
Stacking: Stack smaller pots and pans inside larger ones in cabinets. Use shelf liners to prevent scratches.
Use Dividers: Add dividers in cabinets to create separate sections for each item.
b) Drawers
Flat Storage: Store pans on their sides to prevent scratching. Use organizers if necessary.
Insert Dividers: Keep lids and smaller items separate from the pots and pans.
c) Hanging Storage
Pot Rack: If you have space, a pot rack can display your cookware while saving cabinet space.
Wall Hooks: Hang frequently used pots and pans within easy reach.
6. Organize Lids
Lid Holder: Use a lid organizer or holder to keep lids upright and accessible.
Stacking: If there is limited space, stack lids in an available spot or store them in cabinets with their corresponding pots.
7. Label Where Needed
Label Containers: If you use storage bins or drawers, label them to locate what you need easily.
8. Finalize Arrangement
Accessibility: Place the pots and pans you use most frequently at eye level or within easy reach.
Seasonal Use: Store less frequently used items at the top or towards the back of your storage.
9 Organize by Material
Store pots made of different materials separately (e.g., cast-iron, ceramic, non-stick) to prevent chemical reactions and scratches.
10. Regular Maintenance
Routine Check: Periodically assess the condition and tidiness of your cookware.
Rearrange your organization as needed to accommodate changing cooking habits or the acquisition of new cookware.
Final Thought
These are the different ways to organize your pots and pans in the kitchen. The organization method you choose will depend on the type, size, and number of pots and pans you have. Choose a storage type /organization type that suits your desired need and contributes to the overall appearance of your kitchen. Please let me know the kind of organization you choose and why it stands out to you in the comments below.